Let me introduce [Howard]. He loves electronics, has a bunch of old scopes, is obsessed with time accuracy, and happens to be a retired medical doctor.
What do you give a chap like Howard for his birthday?
Well, his loving son [Nick] had the answer! He gave his dad the ultimate gift – an Oscilloclock Exo 3KP1 with a custom medical-themed animation!
Hong Kong connection
[Nick] first reached out in February to check out his options. He explained that the family was spread across continents, but would be uniting in Hong Kong for the big birthday event, in June. Four months away!
Could Oscilloclock deliver something glorious and mesmerising for his dad – but in time, and within budget constraints?
Yes and yes!
The lab just happened to have a set of fully assembled, older-revision boards just begging for love and attention. And also in stock was a beautiful new cast acrylic Exo case and CRT ring set — with some slight imperfections.
By using these components, we could reduce the time needed to craft the device — and offer a substantial discount to boot!
The clock was ready and shipped a week ahead of time – making sure [Howard] would not go disappointed on his big day.
Perfectly Imperfect
Frequent readers may recognise that your humble Oscilloclock senior engineer has perfectionist tendencies. Any “slight imperfections” come with some concessions.
On the other hand, owners rarely perceive such imperfections as such. They either don’t notice them, or they actively enjoy them as features, making their beloved device just that much more unique.
Quiz time! Can YOU spot any blemishes?
Make a wish!
[Howard] no doubt got quite a surprise when he turned on his birthday present and saw it literally light up the room!
No, this was not a pyrotechnic effect made specifically for the occasion! It’s called an inrush current limiter, designed to preserve the longevity of the CRT.
Howard’s device employs what we call “a sacrificial lamb”. In this scheme, a light bulb is used to absorb most of the switch-on current that would otherwise flow directly into the CRT heater. The bulb lights up brilliantly for a time, then dies out as heater resistance increases and current decreases.
The Oscilloclock Exo is a popular model. But every clock simply must be unique! [Nick] had just the trick in mind, with a request to incorporate the words “What’s Up, Doc?” to reflect his father’s illustrious medical career.
Can do. But we took it a small step further — a simple animation depicting a patient standing behind an X-ray exposure screen!
Eye candy. Proudly minimalist animation on proudly minimalist hardware!
Post-ceremony
Private birthday celebrations are private; we have no photos to share here of the ecstasy we hope [Howard] felt when, surrounded by [Nick] and his loving family, he unwrapped his birthday gift.
However we do have a photo of the clock in-situ, after the trip back home:
We wish [Howard] many future returns and thank [Nick] for the opportunity to bring joy to the family on their special occasion!
Like what you see? Do YOU have a special person who deserves a special work of art? Let us know. We even gift-wrap!
Like what you read? Every article here has been crafted by hand! While we use AI for idea generation and research, we never use it to write content or even to adjust the tone. What you read comes directly from the heart. Enjoy!
The long-standing favourite amongst Oscilloclock aficionados is the External GPS (Garmin ‘puck’) option. Features include:
a long cable that allows positioning for best sensitivity
an inbuilt magnet for attaching to metal beams
a gorgeous connection system – satisfying haptics and robust locking
Of course, we also have the internal GPS option, where the GPS receiver is mounted on the Control Board itself. This is super nifty, if there is no concern about satellite signal strength where the clock is placed. (This is very rarely an issue. These receivers are extremely sensitive!)
Can you spot the onboard GPS module in this gorgeous OscilloBlock?
Geolocation
The GPS option allows the Oscilloclock to obtain not just time, but also geolocation information from satellites.
Okay, it’s true that Oscilloclocks are generally placed in a fixed location, so showing the clock’s location on a map might not be very useful…
Think again!
How about an OscilloGlobe, to warm up your long-distance relationship? Plot you and your friend’s Oscilloclocks on a spinning globe, and count down the hours til you meet again…
A delightful Heathkit SB-610 shows another Oscilloclock, live and ticking elsewhere in the world! (Want a closeup of this demo feature? See this video)
Or perhaps you fancy an OscilloWear? A wearable Oscilloclock, sporting a miniature CRT and it’s-only-possible-in-Japan miniaturised circuitry! Complete with GPS.
An OscilloWatch capable of recording your sporting activities? With OscilloMaps that guide you to the nearest Oscilloclock retailer? And of course: the OscilloPhone, or oPhone for short?
Ahh, we could have so much fun making devices that use location data…!
Want even more info on the GPS hardware option? We have a nice support page here: Garmin 18x GPS Puck.
NTP – low-cost & extensible
The Oscilloclock Wave is the glorious device that allows your Oscilloclock to connect to a Wi-Fi router and pull in time from NTP (Network Time Protocol) servers.
It comes in different forms, both external and internal:
WaveWave Onboard
Wave Core
The Oscilloclock Wave requires a WiFi connection (and Internet), and some initial configuration – it doesn’t just work straight out of the box, in a standalone way like the GPS option.
However, the Wave has a distinct advantage: it can access various APIs (think: providers of data over the Internet) to pull in and display all kinds of information!
To date, we’ve used this capability in several themed Oscilloclocks: the Astro Clock (pulling in sidereal time from an API) and the AfterShock Clock (pulling in earthquake data).
Sidereal time, for all the astronomers out there!Earthquakes are disasters – no joke. But a semi-live visualization in Lissajous figures? Too cool..
Not saturated yet? For more on Wifi based synchronisation and various configuration options, see the support page: Oscilloclock Wave.
The No Synchronization option!
Do you want to take your Oscilloclock off-grid? We’ll craft you a unique clock powered by wind, solar, USB-C power bank, or even a hamster wheel. (We can even procure extremely low-power CRTs!) But to go fully off-grid, you won’t want to use GPS or WiFi.
A (more likely!) scenario is simply that signal strength is just too poor. Maybe your clock sits in a basement 3 stories below ground…
For such cases, you can set the time manually in the Time Setting screen. Once set, an on-board quartz oscillator then maintains reasonably good time (in the order of seconds per month). You’ll want to adjust it occasionally!
Must it be one OR the other? Can’t a gadget lover have their Oscilloclock source data of different types from both GPS and public APIs over the Internet?
Sadly, no – not in the current Control Board revision. This supports only a single interface, which is occupied by either the GPS or the Wave module. (We have multiple input capability on the long to-do list!)
Oscilloclocks are beautiful and entertaining. There’s that warmth of the CRT filament and the brilliance of coloured phosphor excitation, combined with all the features of our digital era.
But above all – they are clocks! Hope you enjoyed this treatise on how time is managed.
If you’re up for the craziness of an Atomic Oscilloclock, or if you want a custom theme using specific API data, let me know! Otherwise, stay tuned!
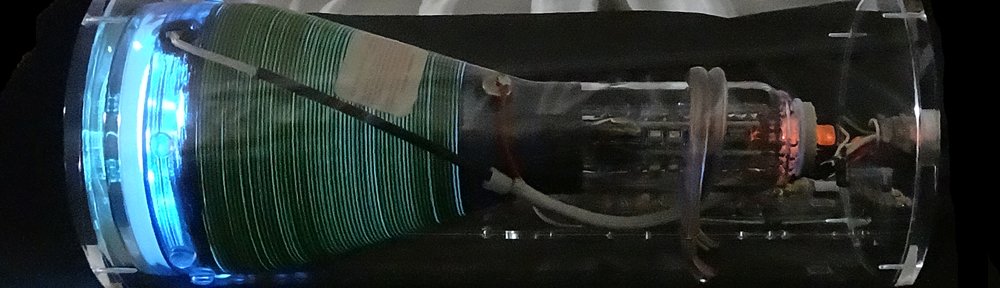
[Atif] is quite fond of his custom Oscilloclock Model 1, originally supplied with a bright green Brimar SE5F/P31 CRT. He just loves its crisp, clear trace! But wouldn’t it be great if he could plug-and-play a different CRT, to suit his mood of the day?
[Atif]’s Oscilloclock Model 1 SE5F with P31 green phosphor… Could we change the mood?
More specifically, could I create a second display unit (the acrylic tube on the left) using a CRT with a soft, long-persistence blue trace? And could he just swap the units around at will, without having to make any changes to the control unit?
Absolutely! But to make the 2nd unit completely compatible for plug-and-play, we’d need the same SE5F type CRT, with a different phosphor. Looking at Brimar’s catalogue, this CRT was available in several phosphors – including a P7 blue. This is the same as used in the original Prototype, and it’s really good at showing off those exotic trailing effects!
So the hunt began…
Now, this particular P7 CRT is famously difficult to come by – whether new OR used.
The most common piece of old equipment employing the SE5F was the ubiquitous Telequipment S51 oscilloscope, but the overwhelming majority of those had a P31 phosphor CRT installed. Indeed, of all the demonstrably working S51’s posted on eBay in the past decade, I have never seen a single one showing an obviously blue trace!
After many months of scouring auctions, suppliers and CRT fanatic colleagues across the globe, I managed to locate one SE5F/P7 in highly questionable condition – and located in Italy! With Google Translate as my friend, negotiations ensued, and – taking a substantial risk that the CRT would actually function – the unit was duly purchased and shipped.
A dirty, slightly rusty SE5F/P7 CRT – snatched from the brinks of destruction in Italy
Often, well-used CRTs exhibit scratches, spots, or burn-in marks on the internal phosphor coating. Fortunately, this CRT’s phosphor proved unblemished! And powering it up (for the first time in decades, most likely), it proved to be electrically faultless, as well!
It works!
Beautifying the Brimar
You may think that cleaning a CRT is hardly worth writing home (or the world) about.
Eucalyptus oil is amazing
But this specimen was slathered in sticky, gooey tape residue, which had to be carefully removed. My chemical of choice for this is, believe it or not, eucalyptus oil! Not only does it remove the gunk, but it also serves to clear up any nasal or bronchial congestion that the technician may have at the time. Two birds with one stone!
The more difficult issue was removal of the graphite coating. During manufacture, the front-most 8 cm of the glass of each SE5F was sprayed with a conductive graphite-based paint. Why? To make a high-voltage capacitor with the spiral accelerator anode (the beautiful green stripes) and similar graphite coating on the inside of the glass. By connecting the external coating to ground, the thrifty circuit designer could avoid using a separate (and expensive) high-voltage filter capacitor in the anode power supply!
External and internal graphite coatings form an effective high-voltage capacitor!
Why remove this coating? Because during use, it gets scratched and marred, as the above photo shows. Such a messy CRT could never be worthy to mount in a clear cast-acrylic case for an Oscilloclock! In addition, the coating obscures some of the attractive spiral accelerator anode, and blocks the incredible view of the trace from behind. And regarding circuit design, we at Oscilloclock NEVER scrimp – the Power Board has oodles of filtering capacity without relying on a graphite coating!
While eucalyptus oil is also effective, it can get rather expensive in the quantity required – especially as the Oscilloclock lab is not conveniently located in Australia! The more reasonably priced chemical of choice here is nail polish remover. As always, there is a side-benefit – the nasal passages are assuaged by a delicate floral scent during cleaning, and fingers have an arguably nice smell that lingers for quite a while!
Joking aside – gloves, open windows, good ventilation, and safety glasses (in case the CRT implodes) are key ingredients for this process!
Eucalyptus oil and nail polish remover has done wonders to this Italian-sourced beauty!
Onward!
Having found the perfect CRT, [Atif]’s plug & play unit is now well under construction.
Epilogue – “Good things come in threes”
It’s not good just getting one CRT. What if [Atif] wanted a spare? What if I wanted a spare for my venerable Prototype clock? Following from the Italian success, I continued a further 6-month hunt, and managed two achievements.
The first was a Telequipment S51b unit located in the U.K. that was non-functional, but that I suspected may have a P7 phosphor installed. How could I possibly suspect this? Well, perhaps this is an art rather than a science, but there were several tell-tale signs:
The way the phosphor looked under the camera flash or ambient light
The colour (or absence) of the graticule (the plastic cover in front of the CRT)
The fact that I got a double when I rolled the dice to decide whether to take the plunge or not!
Oops, it was a P31 – the dice did not roll in my favour that time!
The seller of this unit was not willing (or perhaps not technically able) to extract the CRT, check the CRT type, or ship overseas. Fortunately, my colleague in the U.K. was more than happy to receive the scope at his end. Thus arranged, when the unit arrived he extracted the CRT and confirmed that – sadly – I had purchased a P31 CRT.
But I shipped it across anyway, and the CRT tested well. Rescuing a functional SE5F/P31 from eventual demise was still a worthy accomplishment!
The second achievement was prompted by an auction listing for a “Brimar SE5F”, but with little indication as to the phosphor. The photos of the label (see right), even with subsequent close-ups provided by the seller upon request, were not conclusive.
The image shows two characters beginning with ‘P’. It looks like “P1”, which is another extremely common green phosphor used in many CRTs since the beginning of time. However, we saw in the catalogue earlier that Brimar only supplied GV, P7, P31, and P39 phosphors as standard. It is unlikely that any equipment manufacturer would have requested Brimar to produce a custom CRT batch using the less-exotic P1 phosphor… Leaving the P7 as the only likely candidate!
Convinced, the CRT was duly shipped across and tested – and lo and behold, success! A spare P7 was safely procured.
And with that, the long saga of this CRT hunt closes. As they say, “good things come in threes!”
Like what you see?
Cathode ray tubes used to be manufactured in all shapes, sizes, and colours. Some prove harder than others to find! But if you prefer an exotic creation, don’t give up – there is something for you out there, and here at Oscilloclock we will find it.
As always, see previous posts and the Gallery for info on unique creations!
Recently I had an enquiry from [Frank], who had just begun a life-long love affair with scope clocks by purchasing one on eBay. The clock was great – but he felt that the two available screens (simple analogue and digital clock faces) lacked a certain oomph.
He then stumbled across Oscilloclock.com, and in his smitten state immediately reached out with his number one question: just what screens are available on an Oscilloclock?
Well, let me save Frank’s time trawling through years of blog posts. Right here in one place are most of the Oscilloclock screens and features created to date.
Enjoy the show!
Standard Time Screens
These stock-standard analogue and digital time screens may be quite simple, but they do evoke the ‘retro’ look that most people appreciate.
And you can flip a menu setting to display days, months, years in Japanese:
There are also some ‘random’ screens that add in a bit of dynamic visual entertainment:
Random number screen
Random letter sequence screen
Random four letter word screen (clean words only, by default!)
Random phrase screen (the phrase list is typically customized to a theme)
Over the years many folks have requested that I render custom logos in Circle Graphics. Here are some examples:
“Seasonal Treats”
Up next are some fun, mildly interactive animation features. Not exactly screens per se, these animations pop up after a predefined period of inactivity – but only during certain months of the year. Can you guess which months?
There are far too many configuration menu and test screens to present here. Fiddle to your heart’s content!
Q. How are screens switched?
Screens are switched simply by rotating the control knob in one direction or other.
There is also a configurable auto-switch feature; the screen is changed every 90 seconds in a predefined order (with the exception of some animation screens). The display time is configurable, and the auto-switch feature can also be turned off for those who prefer to switch screens manually.
Q. How are screens selected & configured?
Customers can request screens to include and/or specify the switching order. The configuration is done here in the lab before clocks are delivered.
Oscilloclock also provides a firmware upgrade kit, which allows the customer to upload a revised version of the firmware into the clock themselves. Using this, updates to screens and other features can be uploaded without shipping the clock back to the lab.
Q. What is the process for rendering a custom screen or logo?
We typically prepare a mock-up based on the customer’s description, sketch, or image file. This is tweaked as needed until the screen looks just right to the customer.
Oscilloclocks are special. Oscilloclocks are unique. We know this. But in November 2015, a request for something exceptionally special and unique arrived from [Andrew] – he wanted me to craft a Metropolis movie themed timepiece!
Metropolis is a classic science-fiction silent movie created by Fritz Lang in 1927. It’s an amazingly beautiful film with a fascinating plot, passionate acting, and attractive futuristic props and architecture heavily influenced by the Art Deco and other artistic movements. (Haven’t seen this movie? I recommend “The Complete Metropolis”, Blu-Ray version!)
Well, Andrew was building a very large space at his home dedicated to the Metropolis movie. It would be a full-on “man cave”, with a lounge/bar, music and video venue, mad scientist lab, and collection display space. The mad scientist part of the building would house various scientific demonstrations based on vintage physics or chemistry experiments, with a dose of mad science thrown in.
Andrew was collecting themed art and memorabilia for his man-cave, and had even commissioned a full size ‘Maria’ robot (#3 in the world) from the licensed manufacturer…
But there was one thing missing – a Metropolis 10-hour clock.
Metropolis Time
In the Metropolis movie, the Rulers enjoy their lives in normal time, but the Workers are forced to perform their heavy-labour duties in 2 shifts of 10 ‘worker hours’ each day. The Workers’ clocks are thus labelled with only 10 hours.
Metropolis clocks – Normal time for Rulers (top), but 10-hour time for Workers (bottom)
The 10-hour clock features in multiple scenes throughout the movie, as clear symbology that the controlling and oppressive Masters can even manipulate Time – if only on the surface!
In this scene, Freder struggles with the clock machine…
[Andrew] wanted to commission an Oscilloclock that would display an authentic 10-hour Worker clock face with accurate hour, second and minute hand movement, as well as the normal 12 (24) hour Ruler clock faces. He also wanted all numerals and characters rendered in the Metropolis font. This could be THE talking piece of the man-cave!
Presenting… the Metropolis Oscilloclock!
After 8 months of discussion and development, the first Metropolis Clock was finally delivered. This unit is based on the same beautiful Toshiba ST-1248D vintage oscilloscope model used in a previous conversion. However, it incorporates some wonderful new features, including LED-backlit valves and an external input feature to support Lissajous figures generated by an iPhone or other device!
Artwork on the splash screen evokes an image of the skyscrapers in the movie poster…The clock keeps both ‘normal’ and Metropolis 10-hour time!
The Metropolis 10-hour clock face!X-Y Input feature allows display of Lissajous figures from an iPhone!
Realistic LED backlighting – enjoy the valves without actually heating them up!
To be continued…
Each of the new features built out for this exotic creation deserves a post on its own. Stay tuned for many more pictures and information about Lissajous inputs, backlit valves, and Metropolis time switching!
Also, careful readers would notice my use of the phrase “first Metropolis Oscilloclock”. Andrew was so delighted with the Toshiba ST-1248D unit that he commissioned a second Metropolis clock with even more firmware enhancements, based on the Tektronix 520A. Another topic for another day!
Metropolis is just fantastic as a theme for a custom Oscilloclock. But if you have a different passion that needs horological augmentation, let me know!